Photomosaic: An Image-to-Mosaic Generation Tool

Have you ever wanted to create a mosaic of a cat’s face with a collection of flags from around the world? “Photomosaic” allows that and more given an input image and image tiles.

You can download the Windows program here.

Photomosaic came about from a question – If I were to replace every pixel of an image with a small “tile” image with similar colors, would the resulting mosaic resemble the original picture? The task seemed simple enough, but resulted in countless hours of researching color matching science, designing graphical user interfaces, writing proper documentation, and so much more.

Task: From a sample image + tile images, output a mosaic

The program operates by going through each pixel in a source image and replacing it with a tile image of a similar color. But how exactly do you compare colors? We intuitively know that “green” and “lime” are more similar to each other than “green” and “red”, but how might we calculate the difference?

We know that each pixel has Red/Green/Blue values. A numerical difference in two RGB colors, 3-dimensional space, can be calculated with the Euclidean distance formula. This is akin to finding the hypotenuse of two points like back in grade school, but in three dimensions this time. It looks like this:

{\displaystyle d(\mathbf {p} ,\mathbf {q} )={\sqrt {(p_{1}-q_{1})^{2}+(p_{2}-q_{2})^{2}+(p_{3}-q_{3})^{2}}}.}
3-D Euclidean distance formula

Not too difficult! We also need to find the average color of each of the tile images. This is as simple as looping over every pixel, adding up the up the R/G/B values and dividing those by the total number of pixels. So for each pixel in the source image we can calculate the distance to each tile’s average color and choose the tile that is most similar (has the shortest Euclidean distance). Put them together and…

Not bad! I was surprised at how well it worked right off the bat. It matched the colors well enough and painted a picture fairly similar to the original. To keep the output image from becoming too large it was necessary to use a small input image (resized the input image to just 5% of its original size, 64×16 pixels).

Unfortunately everything up until now was the “easy” part. I wanted to improve the program, starting with color accuracy.

In the output image above, some areas look a bit strange. Take the sky on the top-left for example – The program decided to use dark green tiles for an area that is obviously blue. Why is this?

The answer lies in our biology. While computers use numbers to differentiate colors, humans perceive colors by a complex interaction of light on our eyes and signals to our brain. A more accurate color-matching solution requires we do so like our own eyes. Enter the International Commission on Illumination (CIE).

In 1976 CIE came up with the very first color space (CIELAB) for quantifying perceived color difference, as well as a formula for finding a distance (Delta E) between colors, shown here:

CIE76 color difference formula
CIE76 delta E formula

It looks a lot like the old Euclidean distance formula, with one key difference: The R, G, B colors are instead L, a, b colors. Conversion from RGB to LAB can be done in a separate formula.

A delta E distance is expressed as a number between 0 and 100. Any number less than 1 is an imperceptible color difference, while 100 means that the colors are completely opposite. This article explains delta E and color spaces much better than I ever could and I recommend that you check it out.

By instead recording the delta E distances between the (LAB converted) pixels of the input image and the (also LAB) average colors of the tiles, we get a more accurate output:

That seemed to do the trick – The sky is now blue, and as an added bonus the colors are much more vibrant. Let’s do it again with a larger input image!

Different algorithms produce different results. The mosaic above was done with CIE94, an upgrade to the CIE74 formula which takes into account lightness, chroma, and hue. If you try this yourself, keep in mind that the algorithm will not work well if the tiles provided are too few or have little color variance.

The more accurate algorithms were also much more computationally expensive, so I incorporated multi-threading into the application as well. All of the work done is by-pixel, so I could easily split the input image into equal parts, run the calculations on each part, and create the mosaic at the end.

I polished the program up by developing a graphical user interface with Windows Forms. I also decided to provide some proper documentation with a compiled HTML file (.chm) using WinCHM.

And that’s about it! It’s been a long ride, and one that I’ve quite enjoyed. I still come back every now and then to add new features or improve old ones. Give it a try for yourself, and let me know how it works for you. Thanks for reading!

Optimizing server.properties for a Minecraft Java Edition Server

The server.properties file is the main point of configuration in a vanilla Minecraft server. Here you can change how the server behaves. Some configuration options can affect the performance of the server, and if you are experiencing server lag you may want to check these out.

Here is the default server.properties file.

Performance-Heavy options

KeyDefault ValueRecommended ValueReasoning
view-distance103 (fast)
3-9 (medium)
This is the amount of chunks the server is allowed to render at once around each player. Higher values require more processing power. This is perhaps the single most important value to consider when attempting to increase server performance.
network-compression-threshold25664 (slow internet)
512 (slow CPU)
Networking packets below this number (in bytes) will be compressed. If you have a slow upload speed, decrease it. If you are lacking CPU power, increase it.
max-players205 (low)
10 (medium)
Change the maximum number of players able to log in at once with this option. Fewer players are easier to manage by the server.
max-tick-time60000-1This is the amount of time (in ms) that the server will wait after a freeze before crashing entirely. It may be best to disable this with -1 for a slower server.
max-world-size299999841000 = 2000×2000
4000 = 8000×8000
A server can better handle a smaller world.
player-idle-timeout05 (fast kick)
60 (slow kick)
This feature is disabled by default. When enabled, a player is kicked from the server if idle for X minutes.
generate-structurestruefalseIf you do not require structures like villages and strongholds, disable them with this option.
spawn-animalstruefalseIf you do not require animal spawning, disable it with this option.
spawn-monsterstruefalseIf you do not require monster spawning, disable it with this option.
spawn-npcstruefalseIf you do not require villager spawning, disable it with this option.
max-build-height256A multiple of 8 < 256You can decrease the maximum build height with this option. Less blocks per chunk means faster load times.

That’s about it. There isn’t too much you can do here, but it is worth understanding what you have available to you.

If you’d like to beef up your vanilla Minecraft server even more consider checking out PaperMC, a version that offers unparalleled performance and the ability to add plugins. I will be posting a guide to tweaking those configuration options soon.

I hope this helps!

Is My Computer Good Enough to Run a Minecraft Server?

Want to host a Minecraft server but are unsure of if your computer can handle it? The answer: It probably can!

Small Minecraft servers are fairly easy to run, especially if nothing else is running on that system. I’ve run MC servers on nothing more than a little $5.00 chip in the past. I’ve found that the biggest constraint is often your internet speed – Specifically your upload speed (Here’s a tutorial on getting a Minecraft server working with bad internet).

That said it is worth knowing just how much your computer can handle. Primarily, how many players can be on the server at once. This is hard to estimate because the behavior of players is very random. Some players might travel little, others might travel a lot and very fast. Some players may create entity farms which tend to consume a lot of processing power. Even with all of these variables we can use some tools to make an educated guess as to how many players your server can handle. Let’s get started!


Memory Use

One of the biggest factors we should consider when setting up a Minecraft server is the amount of memory, or RAM, that is in the system. Minecraft is very RAM-hungry, especially if you also have plugins or mods running on the server.

RAM usage scales fairly linearly with the amount of players online, the size of the world, and the amount of plugins or mods being used. This chart from Apex Minecraft Hosting is a good reference for most use cases:

RamPlayer Slots*World Size*Plugin/Mods*
1GBUp to 5Up to 5GB0
2GBUp to 10Up to 8GBUp to 10
3GBUp to 15Up to 10GBUp to 25
4GBUp to 25Up to 15GBUp to 40
5GBUp to 30Up to 20GBUp to 45
6GBUp to 40Up to 30GBUp to 50
8GBUp to 90Up to 60GB50+
10GB150+Up to 100GB50+
15GB150+150+ GB50+
Apex Minecraft Hosting plans

If you’re reading this article you likely have an older/weaker system with a small amount of memory. It will be very beneficial to add more memory for these purposes.

It is worth mentioning that not all RAM is made equal – Older DDR2 memory is much slower than newer DDR3 or DDR4. This is something you will probably not be able to change since your motherboard likely only supports one type.


Storage

The storage device(s) on your server can have a dramatic impact on game performance. These come in a few varieties:

  • Mechanical Hard Drives (HDD)
  • Solid-State Drives (SSD)
    • SATA solid-state drives
    • NVMe solid-state drives

Mechanical hard drives are the cheapest per gigabyte. They are also the slowest and most fragile as they rely on moving parts to operate.

Solid state drives have no moving parts and are by comparison much faster. NVMe SSDs are a relatively newer technology and are even faster. Both are more expensive than HDDs however.

I recommend running your Minecraft server on an SSD if possible. This will allow the machine to access data faster and provide a much smoother experience to players.


CPU Benchmarking

Benchmarking means to “evaluate or check (something) by comparison with a standard.” Here we will benchmark a computer to see how well the processor/CPU performs. Minecraft servers run exclusively on the CPU and perform better on CPUs with a fast core-clock (measured in GHz). They cannot typically take advantage of more than a couple cores. This is worth noting because traditional server-class CPUs like Intel Xeons are usually not preferred for this task as they have many cores but slower core-clocks.

For our testing I’ve chosen the benchmark integrated into 7-Zip as it can be used on both Windows and Linux. We will also use Stress, a Minecraft benchmarking plugin.

7-Zip

This benchmark will test the raw processing power of your computer. Close all other programs before running the test.

Windows

  • Download 7-Zip for Windows
  • Open the program GUI
  • Go to Tools -> Benchmark
  • Use the default dictionary size of 32MB.
  • Run the test with 1, 2, and 4 cores. After each test record the total rating in MIPS.

Linux (Ubuntu)

  • Install 7-Zip with this command:
sudo apt install p7zip-full
  • Run this command, replacing <cores> with 1, 2, then 4. After each test record the total rating in MIPS.
7z b -mmt<cores>

You should end up with data like this:

1 core: 4580 MIPS, 2 core: 10283 MIPS, 4 core: 19493 MIPS

Stress Plugin

I’ve created a Minecraft server specifically for the purpose of benchmarking. The world is empty, which should make the results of the Stress plugin more consistent. Download here:

Now we can start the server and benchmark.

  • Follow the directions in ___readme___.txt to set up the server
  • Connect to the server in-game
  • OP yourself with the console (op <player name>)
  • Run /stress test=chunkgen and record
  • Run /stress test=chunkload and record
  • Run /stress test=entity and record
  • Run /stress test=tps and record the entries under 10s

Your data should look something like this:

chunkgen:	min 2.5, avg 18.4, max 173.9, stdev 29.4
chunkload: 	2750.12ms
entity: 	min 0.5, avg 1.5, max 17.7, stdev 1.5
tps: 		min 0.3, avg 0.7. max 1.0, stdev 0.2

Comparing Data

Now that we have our benchmarking data, we can compare it to data I’ve collected from my own machines as well as data from the web.

My data:

AMD Ryzen 5 3600 6-Core Processor, 3600 Mhz, 6 Cores, 12 Logical Processors w/ 32GB RAM (Windows 10)
7zip:
	1 core: 4580 MIPS
	2 core: 10283 MIPS
	4 core: 19493 MIPS
Stress:
	chunkgen:	min 2.5, avg 18.4, max 173.9, stdev 29.4
	chunkload: 	2750.12ms
	entity: 	min 0.5, avg 1.5, max 17.7, stdev 1.5
	tps: 		min 0.3, avg 0.7. max 1.0, stdev 0.2

MC Server Performance: Exceptional
AMD Ryzen 5 3500U with Radeon Vega Mobile Gfx, 2100 Mhz, 4 Cores, 8 Logical Processors w/ 12GB RAM (Windows 10)
7zip:
	1 core: 5086 MIPS
	2 core: 11088 MIPS
	4 core: 17906 MIPS
Stress:
	chunkgen:	min 3.3, avg 43.5, max 463.8, stdev 65.5
	chunkload: 	4686.09ms
	entity: 	min 1.2, avg 4.8, max 73.7, stdev 7.6
	tps: 		min 0.9, avg 1.2. max 1.7, stdev 0.2

MC Server Performance: Very Good

Other data:

7-Zip benchmark data from various CPUs


Optimization

Perhaps your machine can run a Minecraft server but you are worried that the experience won’t be very good. Not to worry! Here are some steps you can take to optimize the server:

I highly recommend checking out this tutorial on optimizing your server’s internet speed requirements as well.


Thanks for reading! Hopefully this article helped.

How to Host A Minecraft Server With Poor Internet – Tutorial

Minecraft servers need fast internet to function well. If you’re stuck with slow internet due to cost or availability there are some steps you can take to optimize your server. Here I’ll talk about what I’ve done to run a small MC server on an upload speed of just a few megabits-per-second.

Internet speed comes in two varieties: Download and upload. Sometimes these speeds are about the same. It is more common though to have a higher download speed. This is usually because of infrastructure limits, and because consumers require fast download speed more than fast upload. Unfortunately it isn’t always possible to upgrade your upload speed. My own internet plan is 30mbps down / 3mbps up. You can test your own plan here.

Upload speed is generally more important than download. It’s difficult to know just how much upload speed you’ll need. I’ve seen people say you need 30kpbs per user to 300kbps or more. This number varies so much because there are a lot of factors to consider, like the game version, server framework, and server settings.


Server Framework

The official Minecraft server framework is a bit lackluster. It doesn’t support custom plugins, has fewer options and is less performant than some other frameworks. I highly recommend PaperMC which has unparalleled performance, and is exactly what we want here. There is also Spigot, a more performant version of Bukkit, which is itself is more featured than vanilla. Any of these three options will allow you to further customize your server and add plugins.


Render Distance

Perhaps the most relevant factor here is the render distance setting. This is a configuration option that dictates how many chunks around players the server is allowed to send out. This is different from and takes priority over the client-side view distance option. The lower the value, the less chunks are loaded around players, which means bandwidth saved. The method for changing this value varies depending on how your server is set up.

For a vanilla or Bukkit server, in server.properties: view-distance=[3-32]

For a Spigot server, in spigot.yml: view-distance=[3-32]

For a Paper server, in paper.yml: view-distance=[3-32]

If you’d like to maximize view distance you might install View Distance Tweaks. This plugin allows the server to dynamically change the view distance depending on how many chunks are loaded. You could set it up so that if only one person is playing the max amount of view distance is set whereas if ten players are on it is at minimum. It takes a bit of tweaking to get right but is well worth it.


Compression

Minecraft servers compress the packets of data sent to players. By default only larger files are compressed, while smaller files are sent through normally. There is a configuration file we can edit to change this:

In server.properties: compression-threshold=[0-65535, -1 to disable]

By default this is set to 256, which means that anything over 256 bytes will be compressed. I have mine set to 64, which is the minimum recommended by the Wiki: The Ethernet spec requires that packets less than 64 bytes become padded to 64 bytes. Thus, setting a value lower than 64 may not be beneficial. It is also not recommended to exceed the MTU, typically 1500 bytes.” Note that this comes with a tradeoff – Compressing more packets will use more CPU power.


Limit Travel

If your server uses the EssentialsX plugin your players may have access to homes and warps which allow them to travel instantly by entering a command. If this is used frequently the server will have to send way more chunk data than usual. In the configuration file you might change:

  • Who has access to homes or warps
  • How many homes or warps they are allowed to create
  • If there is a fee to use them
  • How often they are allowed to use them in seconds

One drastic option is to disable elytra. You might choose to do this if players are constantly exploring and generating/reloading chunks too fast.


Remove or Disable Plugins

Some plugins use a considerable amount of bandwidth to operate. Dynmap for instance, a plugin that generates a map viewable in your browser, acts as a webserver and requires as much bandwidth as it takes to serve the images for the map. Here you might consider reducing the quality of the images, or moving the fileserver to a separate machine with more bandwidth available.

It is difficult to gauge how much bandwidth is being used by plugins, though if you find that you aren’t using some it may be best to remove or disable them.


General Performance Tweaks

Here are some general performance tweaks that may help squeeze a bit more performance out of your server:


Hopefully this all helps. It can be a difficult problem to tackle as every server is different and there will rarely be a consistent bandwidth demand. That said, understanding the issue and making relevant changes worked for me and I hope it works for you, too.

If you liked this article, maybe check out one of my others where I run a Minecraft server on the tiny Raspberry Pi Zero single-board-computer.

Visualizing Anime Preferences by Region – Anime Heatmap Project

MyAnimeList, or MAL for short, provides detailed information for anime and also allows users to create an individualized list of all the anime they have watched. Various parts of this list are customizable, including the ability to give shows a score from 1 to 10.

MyAnimeList page for Fullmetal Alchemist: Brotherhood

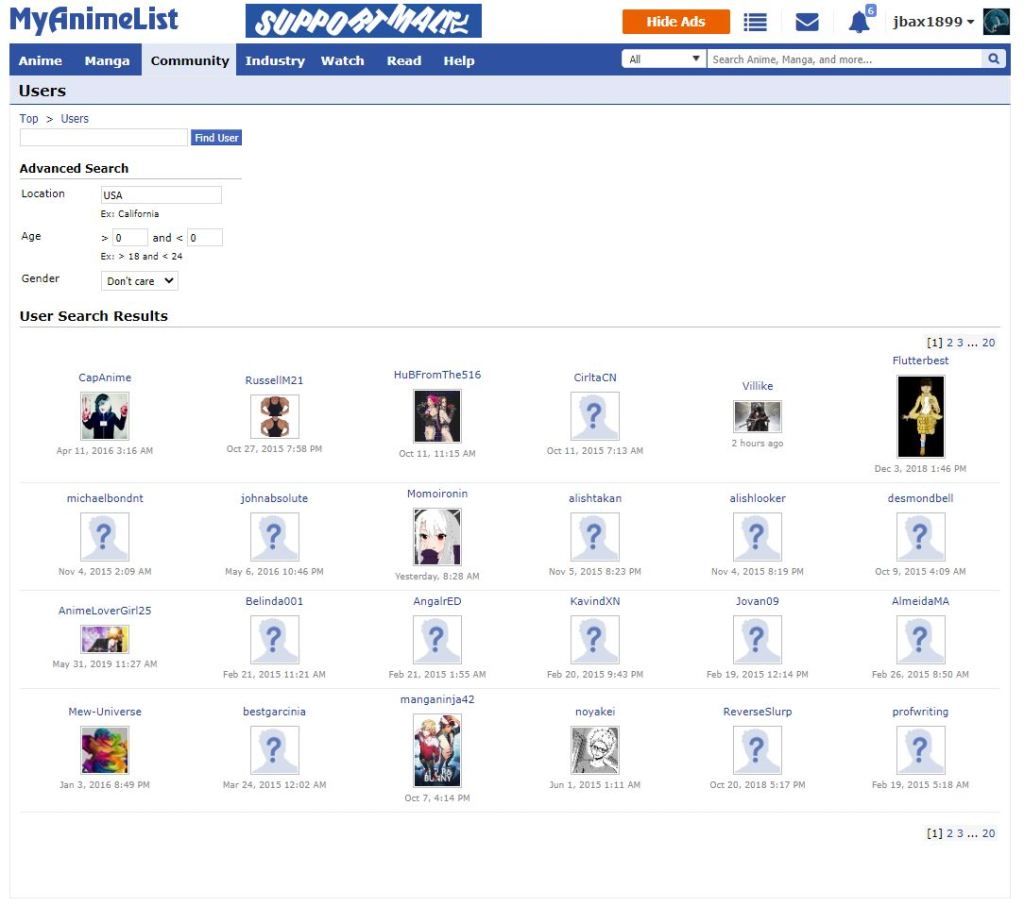
While browsing around MAL I noticed something interesting that is present on some user’s profiles – Everyone has the ability to list their geographical location. Moreover, you can search for users by location. This got me wondering if I could collect data from users in a region that I specify.

MyAnimeList user search

Yup! If I enter “USA” I am given a list of users which have that listed as their location. And there are a lot. On the user search page up to 24 users are displayed at a time. As far as I know there is no way to do such a search and show all users at once, so if I want to gather data on everyone in a search I will need to scan through every page. Luckily for me, the URL of these searches is pretty easy to manipulate.

https://myanimelist.net/users.php?cat=user&q=&loc=USA&agelow=0&agehigh=0&g=&show=24

Here is the URL for page 2 of a user search with the region “USA” specified. Each page contains 24 user listings, so page 2 has the extension “&show=24”, which means “show listings 24 through 48.” Page 3 would have the extension “&show=48” and so on.

To download all of these pages I used a Chrome extension called Simple Mass Downloader. In the Download List tab I set a pattern URL that looks like this:

https://myanimelist.net/users.php?cat=user&q=&loc=USA&agelow=0&agehigh=0&g=&show=[0:24000:24]

Basically that extra bit at the end specifies that we should download all of the pages between 0 and 24000, skipping by 24. So we download pages 0, 24, 48, 72, 96, all the way to 24000. In the event that there aren’t that many pages/users, the download just returns a “Failed – No file” message. Doing this with the region USA specified gave me 726 pages (That’s over 17,000 users!) in under a minute.

Now that I have those search result pages, I need to extract the usernames. I wrote a program in C# to read the html files and find the usernames. I noticed that usernames are listed in profile image links as such:

<div class="picSurround"><a href="/profile/jbax1899"><img class="lazyload" data-src="https://cdn.myanimelist.net/images/userimages/4206707.jpg?t=1602991200" border="0" width="48"></a></div>

So to pull a username I can look for the beginning part of that line and copy what comes right after right up until the closing double quotation marks. Here’s the code I wrote to do just that:

string[] filePaths = /*FILE DIRECTORY HERE*/
string searchFor = "\"picSurround\"><a href=\"/profile/";
foreach (string filePath in filePaths)
{
	StreamReader file = new StreamReader(filePath);
	string line;
	while ((line = file.ReadLine()) != null)
	{
		int index = line.IndexOf(searchFor);    //find where the username should be
		if (index != -1)
		{
			string username = "";
			for (int i = index + (searchFor.Length + 1); i < line.Length; i++)   //record username, up until the first double quotation mark
			{
				if (line[i] != '\"')
					username += line[i];
				else
					break;
			}
		}
	}
}

This will build a list of usernames out of the html search pages I provided.

Now I want to pull anime scores from the lists of these users. I found jikan.net, a C# wrapper, to be a perfect fit for this project. Jikan.net offers functions like “GetUserAnimeList” and “SearchAnime” to quickly and easily access the MAL database.

I created a WinForms application for ease of use. Now I can easily view the usernames collected, specify an anime to search for in user’s lists, watch it run, and view the results. You can download it here to use yourself.

One restriction I had to deal with is the rate limit of MAL’s API. I could get away with 1 query per second most of the time, but it was more safe to limit myself to 1 query per two seconds. When pulling up anime lists for hundreds of users, this all ends up taking quite a while. For the sake of time I decided to record up to 20 scores per region before stopping and moving on to the next.

Now that I have the anime scores I can create some interesting visualizations. This map was created with the US heat (choropleth) map from amCharts. An interactive version is available here.

There wasn’t too much variance in the data – All scores were between 7.5 and 9, and the average was about 8.3. There doesn’t seem to be a particular pattern either. Perhaps the anime I chose in this example was a bad pick as it is one of the most loved in the entire medium, so the scores would always be decent on average. Even if the visualization isn’t very enlightening, I think it is an interesting proof of concept for what can be done with data gathered from MyAnimeList.

How to Make A Minecraft Server With The Raspberry Pi Zero

When I first heard of the Raspberry Pi Zero, the smallest single-board computer in the Pi family, one of the first things I thought to use it for was a Minecraft server. Yes the specs are low, but perhaps with enough fine-tuning I could turn it into something usable, I thought.

Some initial research online didn’t give me much hope. All I could find were nay-sayers criticizing the relatively tiny amount of RAM (512MB) and the measly 1 GHz chip on the device. They certainly are tight restrictions, but with enough work the tiny Raspberry Pi Zero can do some amazing things – Including running a Minecraft server.

Well, with some caveats anyway.

The plan

Because of the device limitations I had to right away decide between two paths: A, use an older and lighter version of Minecraft or B, use a game mode of Minecraft that is inherently easier to run. I didn’t think the former would be very interesting so I opted to create a server focused on the game mode known as Skyblock.

A new Skyblock island

In Skyblock the player spawns on a little island with some basic supplies and is tasked with producing more resources and expanding their island. It lends itself to this task very well as there are hardly any blocks or entities to render, making it quite easy to run on low-end hardware. And though it probably hurt the performance some amount, I decided to use a plugin for this, ASkyBlock, instead of a custom world file. This allows for multiple players to easily create their own islands and interact.

Setting up the Raspberry Pi

Here are the parts I used:

  • Raspberry Pi Zero
  • Micro-SD card
  • 5V, 1000ma USB adapter
  • Micro-USB cable
  • Cheap micro-USB to ethernet adapter (the quality isn’t too important as our server will be quite small and won’t use much bandwidth)
  • Ethernet cable

Install Raspbian onto the SD card. Connect power and internet to the Pi, plug in the SD card and turn it on.

Next, enable SSH. This is the easiest way to interact with the Raspberry Pi. When that is done log in to the Pi using PuTTY on your PC.

Creating the server

I won’t go into too much detail on setting up a regular Minecraft (PaperMC) server, but these are generally the steps I took.

On your Windows machine, download and run BuildTools. You’ll need Git to do this.

Now download and run Spigot. I chose version 1.12.2 as it is in my opinion the perfect blend of being featured but not too new and difficult to run.

Finally, download and run PaperMC. You’ll run this instead of the Spigot jar file. Paper is a highly-performant Minecraft server that will really allow us to get the most out of our little Pi.

You can now create a .bat file to start the server with on your Windows machine. Boot up the server, accept the EULA, start it again, and it should load everything with no issues. You should be able to access the server in-game with the IP “localhost”.

You’ll spawn into a regular Minecraft world, but remember – We wanted to create a Skyblock game. So, I went into the server files and deleted the “world” folder, and replaced it with a map that was completely empty (a superflat world with just a layer of air). I built a little square for players to spawn on as well. Now we’re ready to set up ASkyBlock.

Configuring plugins

I used a variety of plugins to make the server:

Only ASkyBlock was really necessary, but the others did make my life a little easier.

The usage for ASkyBlock is pretty simple – When you spawn in to the server, type /island to create a new island for yourself. You also have the option to create two islands near each other for you and a friend to play on.

Now that we have the server set up, we need to make sure that it can also run on our comparatively anemic hardware. So, on to…

Optimizing!

performance monitoring with htop

The first things we should look at are the configuration files for the server. This won’t be running on regular hardware, so we need to dial some settings back a bit.

I used this really good article on Spigot server optimization to help me through this. I followed all of the steps that had either a Medium or High performance impact listed. One of the most impactful changes I made was to view-distance in Server.Properties, which I changed to a measly 3. This would be quite annoying in a regular Minecraft game, but shouldn’t bother anyone in Skyblock. I also set the maximum players to 5.

I also used the JVM startup flags linked in the article. I allotted exactly 400MB to the server task with the argument -Xmx400M. And here’s a good time to make the startup script (start.sh) that will be used in Raspbian!

You could add plugins made for optimizing performance like ClearLagg but I didn’t find the need.

Another thing we can do to squeeze a little more performance out of our Pi Zero is to overclock the CPU. It’s as simple as adding a few lines to a configuration file and restarting. Do this at your own risk! While it’s probably perfectly safe to overclock the Pi Zero as there’s so little current running through the thing, accept the fact that it may cause irreparable damage to the device. Do some research if you don’t feel comfortable.

I used this tutorial to overclock the Pi. I ran a benchmark before and after applying the changes and here’s what I got:

The command:

sysbench --test=cpu --cpu-max-prime=2000 run

Results (without overclock):

Test execution summary:
    total time:                          54.4052s
    total number of events:              10000
    total time taken by event execution: 54.3295
    per-request statistics:
         min:                                  2.47ms
         avg:                                  5.43ms
         max:                                 45.62ms
         approx.  95 percentile:              12.90ms

Threads fairness:
    events (avg/stddev):           10000.0000/0.00
    execution time (avg/stddev):   54.3295/0.00

Results (with overclock):

Test execution summary:
    total time:                          48.6731s
    total number of events:              10000
    total time taken by event execution: 48.5755
    per-request statistics:
         min:                                  2.24ms
         avg:                                  4.86ms
         max:                                 22.65ms
         approx.  95 percentile:              12.61ms

Threads fairness:
    events (avg/stddev):           10000.0000/0.00
    execution time (avg/stddev):   48.5755/0.00

I ran each test a few times, and consistently got roughly a ~10% increase in performance. I’d say that’s pretty decent for so little work.

Starting the server

Now that our Pi is prepped and our server configured, we are ready to run the Minecraft server for real.

Copy the entire server folder over to your Raspberry Pi. This is made easy with SSH which we set up earlier. We can use a program like WinSCP to log in to the Pi and transfer the files through the local network.

Now access the folder on your Pi with a PuTTY session. Locate the start.sh file you made earlier and run sudo bash start.sh to start the server. With some luck, the server should boot right up (though it might take a few minutes).

Your friends can join you by connecting to your IP. To get that to work though you’ll need configure your router to port forward Minecraft’s port, 25565, to the Raspberry Pi. If you own a domain name (like wordpress.com) you can connect it to your home’s IP so that people can use the domain instead of your IP.

Occasionally on startup the server will panic, thinking it has too little RAM. The error looks like this:

Exception in thread "main" java.lang.OutOfMemoryError
        at java.io.FileInputStream.readBytes(Native Method)
        at java.io.FileInputStream.read(FileInputStream.java:233)
        at com.destroystokyo.paperclip.Paperclip.getBytes(Paperclip.java:170)
        at com.destroystokyo.paperclip.Paperclip.checkJar(Paperclip.java:181)
        at com.destroystokyo.paperclip.Paperclip.run(Paperclip.java:67)
        at com.destroystokyo.paperclip.Main.main(Main.java:14)

You should be able to just run the command again to hopefully get past it.

Conclusion

Honestly, it’s not too bad. You won’t be able to have tens of players at a time but the server can definitely handle at least a few people. With just myself on the server it runs near flawlessly. The server sat at around 70% CPU usage most of the time. If you are hitting the CPU cap too often and need a greater boost you can go back to the configuration files and tighten the settings up even more.

Since resources are so tight I do recommend preparing for server crashes. You can do this by setting up a script that detects if the server is running and if not, restarts it. What’s even better is having this script start when the Pi is rebooted.

It’s frankly amazing that all of this can be done with a chip about the size of my thumb and a couple of attachments. And I think with this setup we haven’t made too many compromises that would inhibit a player’s enjoyment.

If you have one of these devices laying around, consider giving this project a try.

In a future project I will be doing something similar with an old phone, so stay tuned for that.

Thanks for reading!

TraderBot – A Discord Stock Trading Game

In a collaboration with AirmanEpic, we set out to create a Discord game bot that allows users to trade stocks virtually without risking real-world money. A game will run for a set amount of days, and at the end the player with the highest net-worth is deemed the winner.

The bot can be added to your own Discord server with this link.

Once the bot has been added you can begin a new game with the !start command. You also need to specify the number of days the game will run for, and the maximum number of players allowed to join.

Everyone else can join the game with the !join command. Something to keep in mind is that only one instance of the game can run per server.

Now let’s buy some stocks!

Stock prices are determined by the current market price. You can track these yourself, or use the !quote command to get the current price.

You can purchase a stock with the !buy command, specifying a stock and an amount.

To sell a stock, use !sell the same way.

To look at your current balance and your stock portfolio use !status or !statusfull.

!leaderboard gives you a list of all players and their net-worth.

When the game finishes, the player standings are revealed.

Here is a list of available commands (also accessible with !help):

  • !info
  • !help <command>
  • !start <days> <max players>
  • !join
  • !quote <stock>
  • !buy <stock> <amount>
  • !sell <stock> <amount>
  • !status
  • !statusfull
  • !leaderboard
  • !endgame